763-401-2535

About HRS-Admin

This author has not yet filled in any details.
So far HRS-Admin has created 61 blog entries.

Top 7 DIY Roof Maintenance Tips for Minnesota Homeowners

Top 7 DIY Roof Maintenance Tips for Minnesota Homeowners

July 2021 by Heartland Roofing Siding and Windows

heartland-roofing-siding-windows-minnesota-july-2021

One of the ways of ensuring your roof lasts longer is regular maintenance. Regardless of the quality of your residential roofing materials, they will deteriorate with time due to wear and tear bad weather, and other factors. The following are some of the important roof maintenance tips that can come in handy for homeowners in Minnesota:

  1. Trim Tree Branches
    The first thing you will want to do is to trim tree branches surrounding your home. While mature trees tend to create a warm and welcoming aesthetic to your home, branches tend to drop leaves, seeds, twigs, and other wet materials into your roof. When these materials rot, they make the roof rot as well. Regular trimming will keep your roof safe and in good condition for longer.
  1. Clean Your Gutters and Downspouts
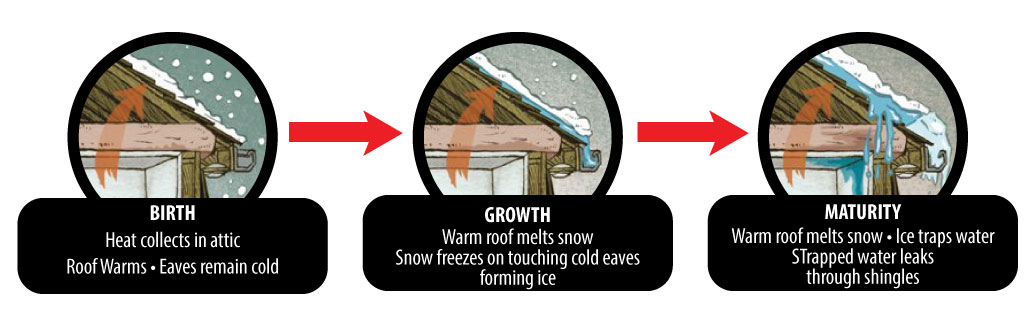
    Clogged gutters that do not drain efficiently are hazardous to your home. They increase the risk of your roof edges and eaves absorbing standing water or overflowing. This can lead to mold and mildew, increasing the risk of roof rot. On the other hand, clogged downspouts crease the risk of water damage to your home’s roof. Cleaning both the gutters and downspouts regularly will keep the roof clean while reducing the risk of roof damage.
  1. Keep Gutter Connections Clean
    The gutter connections should not be left unchecked. Even with clean gutters, the weight and impact of rain tend to pull the channels away from the eaves. The water then splashes in the gaps between the gutters and the roof, creating another risk factor for roof rot. Checking on these connections will ensure they are always clean and that water flows smoothly.
  1. Buy a Roof Broom
    The importance of a roof broom cannot be overemphasized. The roof will always have twigs, leaves, and other debris that tend to pile up. Some people wait for the debris to break up and be blown away, but a good roof broom will help you keep the roof clean at all times. Investing in a good roof broom allows you to easily dislodge and remove residue from the roof, sweeping it away before creating risk for damage.You may also notice algae, mold, moss, and mildew forming on your roof. These biological 291  243            substances can grow fast and start loosening shingles or holding moisture that can cause roof rot. To keep your roof safe, sweep and wash off as soon as you notice them.
  1. Install Leaf Guards
    The purpose of leaf guards is to stand over the top of downspouts and gutters. They act as barriers, blocking leaves, seeds, twigs, and other debris from entering the gutter. Consequently, they reduce the risk of clogs significantly. Since they are readily available and simple to install, investing in leaf guard is a wise decision.
  1. Check Water Marks on the Attic
    You should check for watermarks on the ceiling of your home’s attic or crawl space. The presence of watermarks means that your roof needs repairs or maintenance. Noticing these marks will help you make the repairs early before the damage gets worse.
  1. Check Your Flashing
    Homeowners often overlook flashing in their regular roof inspection. Flashing is a water-resistant material, which is applied around the valleys and seams of the roof. It helps in providing a barrier against moisture in new vents, chimneys, and dormers. If the flashing material is cracked, curled, bent, or damaged, it will need immediate repair or replacement.

Hire Heartland Roofing, Siding and Windows, LLC

While you may do some of the roofing maintenance yourself, you may need professional help to get everything done. Heartland Roofing, Siding, and Windows, LLC have been offering professional roofing maintenance services to homeowners in Minnesota for years. We inspect every aspect of your roofing, closely examining all components, and address even the smallest damage. Hire our services today and have your roof inspected at least once a year to keep you and your family safe.

Think you need repair or want a professional opinion about your roof’s health? Call us at 800-681-4169 or on our CONTACT PAGE to request an appointment from one of our trained professional inspectors.

Sources

https://www.budgetdumpster.com/blog/roof-maintenance-inspections/

https://www.improvenet.com/a/roof-maintenance-tips

Top 7 DIY Roof Maintenance Tips for Minnesota Homeowners2021-07-29T14:00:56-05:00

Summer Roofing Maintenance

Summer Roofing Maintenance

June 2021 by Heartland Roofing Siding and Windows

Heartland roofing siding and windows - 2

Summer is here and the hottest months are coming. With it comes hail damage, high winds, heavy rain, and a scorching sun that can potentially damage your roof. As the heat continues to rise, there are a few things you can do to prepare your home for the rest of this season. Make sure you stay on top of your roof maintenance with these top 7 summer roof maintenance tips.

Check for mold, moss, and algae.
Unfortunately, summer can bring rain and humidity – two conditions that encourage algae growth. Over time, algae can eat away your shingles and lead to roof decay. Algae can be found not only on roofs but also gutters due to the water buildup. Algae is especially evident during the summer months and can damage your roof and gutters if not appropriately addressed.

Over time, moss left on roofs can cause shingles to curl and crack. Heavy moss can block water, create buildup under the shingles, and eventually damage the roof deck. If you see moss or algae on your roof, remove it ASAP to prevent these problems. Mold damage can happen fast, so it’s essential to check your roof often.

Check your attic.
Did you know your attic can heat up to 150 degrees during the summer? Your roof absorbs a lot of heat from the sun’s rays during the day, and it radiates into your attic air. A poorly ventilated attic with heat buildup can shorten the lifespan of your roof. The heat can cause your shingles to crack and curl, resulting in roof leaks. This is why attic insulation is critical in keeping the heat and moisture out during the summer.

It’s also important to look for any signs of moisture and mold in the rafters and attic during your summer roof maintenance since it can point to water leakage from your roof.

Here are some signs of roof mold damage you can see from your attic:

  1. If you discover watermarks along the ceiling or walls of your attic, your roof may have a hole.
  2. If your attic smells musty and you spot mildew across your ceiling, you have a roof leak.
  3. Discolored rafters mean the wood has absorbed the water from a leak above on your roof.

Replace missing shingles.
Replacing shingles may seem like a simple job but placing new shingles over old ones or using the wrong nails can lead to further damage. The wrong shingle could fade, crack, or even grow algae! For example, while inspecting a roof, walking on damaged shingles could cause more damage and lead to roof leaks in the future. Even small patchwork repairs may impact the overall health and safety of your roof. It’s because of these problems that many homeowners hire professionals to inspect and replace missing shingles.

Where Heartland Roofing, Siding, and Windows Come in
Summer hazards on your roof are in most cases unavoidable. When this happens, you will need to work with an expert to repair the damaged roof or replace it with a new one. Heartland Roofing, Siding, and Windows, LLC comprise a team of experts in taking care of your home. Our professionals will help repair your roof as needed and help you overcome the damages that come with summer.

Think you need repair or want a professional opinion about your roof’s health? Call us at 800-681-4169 or on our CONTACT PAGE to request an appointment from one of our trained professional inspectors.

Summer Roofing Maintenance2021-06-30T09:55:20-05:00

Beware of Common Summer Hazards for Your Roof

Beware of Common Summer Hazards for Your Roof

May 2021 by Heartland Roofing Siding and Windows

Summers in Greater Minneapolis, usually come with their fair share of hazards. In fact, buildings in the region take as much beating in summer as they do during the winter. Although the entire building will be affected by the heat and scorching sunshine, the roofs tend to suffer the most. If you are not aware of the hazards to expect, your roof can get damaged and expose your house interior to the fierce weather. Let’s have a quick look at the most common summer hazards, and what you need to do:

  1. Excess heat
    Being the hottest time of the year, your roofs are forced to consume as much heat as they can. In the worst-case scenario, the excess heat during summer can damage your roof to a point where you cannot repair them. When there are prolonged periods of high temperature, some of your roofing materials will swell up. This causes the structural integrity of the roof to be damaged, leading to leaky roof repair or even outright replacement.The excess heat during summer also causes heat-sensitive roofing materials to shift and change shapes. If the materials crack or brittle your shingles, you may encounter extra costs in repair. Other signs that you may need help from a roofing company include shingles that curl up towards the edged or discolored roofing due to heat damage.
  2. Hail Damage
    Hail can have impactful damages to your roof’s structural integrity. Although most people tend to discount the risk of hail here in the mid-west, mere sprinkling can make you incur costs to replace your roof. The impact of hailstones on the roof is often compared to none, and it is almost impossible to ignore the changes in your roof appearance.You may have installed hail-hardy shingles, but with a good beating, you are likely to notice a shiny appearance after the hailstorm. The hailstones often leave irregular patches where they hit, making your roof look different.

Where Heartland Roofing, Siding, and Windows Come In
Summer hazards on your roof are in most cases unavoidable. When this happens, you will need to work with an expert to repair the damaged roof or replace it with a new one. Heartland Roofing, Siding, and Windows, LLC comprise a team of experts in taking care of your home. Our professionals will help repair your roof as needed and help you overcome the damages that come with summer.

Think you need repair or want a professional opinion about your roof’s health? Call us at 800-681-4169 or on our CONTACT PAGE to request an appointment from one of our trained professional inspectors.

References/Sources
https://longhomeproducts.com/blog/3-ways-summer-weather-can-cause-roof-damage/
https://www.hanover.com/resources/tips-individuals-and-businesses/prepare-now-learn-how/understanding-effects-hailstorms

Beware of Common Summer Hazards for Your Roof2021-05-27T16:37:04-05:00

Springtime roofing inspections after winters damage

Springtime roofing inspections after winters damage

April 2021 by Heartland Roofing Siding and Windows

Springtime roofing inspections

Winter is the harshest time of the year for you house.  With the season bringing snow and hailstorms, you will be lucky if your roof survives with little to no damage.  Here is how to check whether your roof needs to be repaired or replaced after the coldest season of the year.

Start from the inside:

If you followed our guidelines on how to prepare your roof for winter, then your house should have been completely sealed against water and moisture.  But sometimes, even the sturdiest structure is no match for the power of nature.  The first step is checking for winter damage is to look for telltale signs of water leakage.

Damp or wet spots on the floor and along the walls usually indicate a leak above or around the area, so be sure to thoroughly inspect your house for those.  Also, examine your ceiling for discoloration or stains, tow clear indications that water has seeped in.  Inspect for cracked plasters, as these may point to a leak inside your walls.  And because new and small leaks usually do not show on the surface, it is always best to contact Heartland Roofing Siding and Windows to inspect for damage that you may miss.

Survey the roof’s exterior:

Your house may be free from leaks on the inside, but that does not mean your roof survived winter unscathed.  Take a walk around your property and survey your roof from afar.  Check whether the slopes are straight and even, and if the pockmarks or dents due to hail or other objects pelting your roof.

Also check for missing or cracked shingles, as a sudden thaw can lift shingles slightly.  When exposed to high winds, they can be torn loose and fly off.  Fortunately, some shingles do not have to be replaced – they just need to be pressed down and resealed.  When you see the parts of your roof are missing or deformed, or if there are foreign objects like tree trucks or satellite dishes that need to be removed from the site, resist the urge to fix the problem yourself and call Heartland Roofing Siding and Windows to do the job instead.

Check your gutters:

Now is a good time to inspect your gutter and eaves, as winter may have brought problems with drainage.  Be wary of ice just by your roof’s eaves and preventing water from flowing down the drain.  Check for leaves, branches, and other objects that may have clogged your gutters, too.  While you can remove small obstructions in the gutter to facilitate water flow, you should always leave ice dams to experts.  Removing ice dams involves complicated procedures, and one misstep can further damage your roof.

Think you need repair or want a professional opinion about your roof’s health? Call us at 515-219-4847 or on our CONTACT PAGE to request an appointment from one of our trained professional inspectors.

Springtime roofing inspections after winters damage2021-04-29T10:22:59-05:00

How to Keep Your Commercial Roof Spring-Friendly

How to Keep Your Commercial Roof Spring-Friendly

April 2021 by Heartland Roofing Siding and Windows

commercial roof

If you are planning to schedule your commercial roofing maintenance and repairs, there is no better to do it than spring. Storms, rainfall, hail, or snow from the previous season may have caused some damage to your roof. To keep everything in check, you may need to perform simple roof maintenance tasks like trimming trees, cleaning gutters, and scheduling a professional inspection to keep your roof spring-friendly.

  1. Wash the Rooftop Surface
    Washing the rooftop surface will help prevent mold infestation caused by dirt accumulation. Simply use cleaning solutions and a commercial pressure washer to keep the surface sparkling clean.
  1. Clean Your Gutters
    Your gutters may be blocked by mold, tree limbs, and leaves that prevent water from reaching the drains. This can lead to overflows and structural damage of your commercial roofs. As you prepare for Sprint, clean the gutters and make the flow streamline. Hiring a professional roof expert can help to access and clean areas of the gutters that you cannot reach. They will also check your gutters for cracks, rusts, or loose parts that need fixing.
  1. Conduct a Moisture Survey
    Conducting a moisture survey with an infrared scan will help see what is happening under the roof membrane. The purpose of the survey is to detect changes in the roof’s materials due to heat retention, presence of water, or loss of heat through insulation. Since such problems are not visible with naked eyes, conducting a moisture survey at least once in five years is necessary.
  1. Repair Leaks
    Your roof may have suffered wear and tear from the harsh winter weather. This could have resulted in leaking holes that bring water inside your commercial property. If not properly handled, such roof leaks could lead to further damage and expensive repairs. A professional roofing contractor will check roof membrane, downspouts, vents edges, caulking, and other roofing areas that may require leak repair.
  1. Trim Trees
    Any overhanging branches or that touch the roof can cause damage by creating shaded and damp areas that encourage mold growth. Make sure you trip nearby trees on a regular basis to keep the roof clear.
  1. Inspect the Roof After Bad Weather
    Severe weather like snow, hail, high winds, and torrential rainfalls can loosen your roof shingles or cause them to crack. Take time to inspect the roof after extreme weather conditions to identify any signs of damage and plan for any necessary repairs. Ice and snow build-up can damage the roof shingles. An inspection of the roof will help you replace the worn-out, damaged, broken, or curled shingles.
  1. Schedule an Inspection
    As you prepare for summer, it is recommended to schedule an inspection with a professional roofing contractor. Heartland Roofing Siding and Windows is an experienced and professional roofing contractor in Des Moines, Iowa Area. When you schedule an inspection with us, we will examine every detail of your roof to detect any damages and repairs needed. We will particularly look at:
  • Damaged flashing
  • Soft spots
  • Ceiling stains
  • Punctures and bubbling in the roof membrane.
  • Loose sealants and fasteners
  • Mold infestation

Think you need repair or want a professional opinion about your roof’s health? Call us at 515-219-4847 or on our CONTACT PAGE to request an appointment with one of our trained professional inspectors.

How to Keep Your Commercial Roof Spring-Friendly2021-04-29T10:12:54-05:00

How to Choose the Right Commercial Roofing Company

How to Choose the Right Commercial Roofing Company

March 2021 by Heartland Roofing Siding and Windows

Heartland-roofing-siding-commercial

In every building, the roof is among the most important components. Apart from protecting against the outside elements, the roof also provides significant structural support. Given the importance of having a good room, you should work with the right commercial roofing company to get everything in order. A professional commercial roofing contractor will always come in handy when you are repairing a small leak, installing a new roof, or replacing a damaged roof. But, how do you choose the right roofing professional?

  1. Choose a Local Company.
    Before considering only the big names you have heard in the industry, research all the available commercial roofing companies in your area. Examine their services and choose a company that meets your roofing needs and budget. Working with a local roofing company is easier as they can always visit you whenever you need their services.
  2. Get Recommendation.
    The easiest way to get a roofing professional is to ask for recommendations from families and friends. The good thing is that you will be working with a tried-and-tested professional, and you will likely land a bigger discount.
  3. Check Credentials.
    Before hiring a roofing expert, make sure you conduct a background check to determine whether they are licenses and insured. The last thing you would want to do is work with an unlicensed contractor. So, check for their license, certification, and insurance to ensure your company is protected from any damage, and that your house is in good hands.
  4. Focus on More than Just the Cost.
    Do not be so much concerned about your budget that you forget to check other factors that influence the quality of work delivered. After the contractor falls under your budget, go further to check their previous projects and compare their work with other contractors in the area.
  5. Read Reviews.
    Since we are living in the digital age, the online space is a bank of information. Check for online reviews on the available roofing contractors in your area. Check how other people have rated them in terms of service quality, reliability, customer service, and customer service. You can check for feedback and testimonials on the company’s website, review sites, and social media.
  6. Warranty.
    When choosing a roofing contractor, go for the one who offers a warranty for their services. This way you will be sure of claiming free repairs and replacements within a specified period after they offer their service. This can prove to be extremely beneficial especially when you roof rails because of poor workmanship or material defects.
  7. Experience.
    Experience is crucial in any field of work. A roofing company with extensive experience and knowledge in this field is more likely to produce quality work than a newbie.

Heartland Roofing Siding and Windows

Heartland Roofing Siding and Windows is a professional roofing contractor serving Minneapolis and surrounding areas.  Our company is licensed and has a long history of prompt and courteous services. Therefore, you are guaranteed of working with experts in this area and quality work on your roof. Call us today at (800) 681-4169 for a free inspection or request a free quote online.

How to Choose the Right Commercial Roofing Company2021-03-15T14:51:46-05:00

Springtime tips for Maintaining Your Roof

Springtime Tips for Maintaining Your Roof

February 2021 by Heartland Roofing Siding and Windows

Springtime tips for Maintaining Your Roof

Just like other parts of your home, your roof requires attention. Although it may be considered the most expensive asset of a home, maintenance will help you avoid incurring unnecessary expenses. To make sure your roofing system lasts as long as possible, make sure you do proper maintenance properly and at the right time. Some of the important tips you might find useful include:

  1.  Prepare for Spring
    As winter comes to an end, your roofing will be suffering from the impacts of the cold seasons. You may need to have them checked for spring to ensure everything is good up there. At Heartland Roofing, Siding and Windows, we take time to assess the roof and identify any damages that may have been caused by winter. Then, we give you a plan to maintaining the roof system and keeping everything in good condition.
  2. Check Your Gutters
    Your gutters are among the most important parts of the roofing system. Dirt or debris shorten the life of your roof, and so does any leakage. Make sure you inspect the gutters at least once or twice a year, and have them cleaned. Consider trimming any large, nearby brands or any tree hangings that may be causing debris build-up in your gutters. If you find any loose or rusted sections, you may want to contact us for replacement or repair.
  3. Inspect Flashing Damage
    Most people do not understand what flashing is. To put it simply, flashing provides seals and seams around skylights, windows, and in places where two slopes of the roof meet. Inspect flashing for calk, rust, or cracks, and take the necessary actions. If flashing damage is not addressed, you could experience leaks that could cause mold problems and water damage inside your home.
  4. Check Your Shingles
    If your rooftop has shingles, you may want those checked out. An expert will look for any damages or whether they are curling. Any loose shingles may also need to be repaired or get a replacement. Probably there will be some nails that need to be hammered back down.

Let Heartland Roofing, Siding and Windows, LLC Come to the Rescue

We understand the importance of a good roofing system. Although you cannot avoid bad weather, taking measures to maintain your roofing system will make them last longer. Our team of experts will inspect your roof, identify any repairs or replacements needed, and leave the roofing looking better than we found it. Call us today at (800) 681-4169 for a free inspection or request a free quote online.

Springtime tips for Maintaining Your Roof2021-02-25T09:56:10-06:00

Tips for Getting Rid of Ice Dams

Tips for Getting Rid of Ice Dams

January 2021 by Heartland Roofing Siding and Windows

Ice Dams on rooff

When icicles hang along the eaves of the house, they tend to look beautiful and attractive. However, they spell trouble because they can loosen shingles, tear off gutters, and make water go back up into the house. The conditions that allow the formation of icicles, snow-covered roofs in freezing weather, lead to ice dams. These are the thick ridges composed of solid ice, which build up along the eaves. In this article, we are going to share some of the fastest tips for ice dam removal, prevention, and long-term repair in Iowa.

Why You Should be Aware of Ice Dams

If you live in Minnesota, you know how cold it can get. During the cold seasons, icicles can be seen everywhere. However, you need to take action since the icicles may be an indication of an ice dam on your roof. Ice dams have a high potential of causing damage to your house. If they loosen shingles and tear off gutters, all the water will be going back into your house.

Ice Dams chart

Ice dams can cause more damages to your house even after the cold season. For instance, you may get warped floors, peeling paint, sagging, and stained ceiling. You may also get soggy insulation in the attic that loses R-vale and attracts mildew and mold. To avoid such damages and hefty expenses in repairs, it is advisable to get rid of the ice dams in the earliest possible time.

The Lifecycle of an Ice Dam

You can prevent ice dams from forming or deal with them better during the cold seasons, it is important to understand their life cycle. This way, you will be able to plan in advance and take the necessary measures.

ice dam growth

At birth, heat collects in the attic and makes the roof warms, but not the eaves. The warm roof melts the snow, which freezes on touching the cold eaves.  At the final stage, the ice collects and accumulates along the eaves to form an ice dam. The melted water from the roofs backs up being it and flows under shingles into the house.

Simple Ways of Preventing Ice Dams

The best way to keep your home safe and in good condition is to prevent it from possible damages. You can prevent ice dams in your home by using heated cables before the bad weather hits.

Simply attach heated cables with clips along the edge if the roof in a zigzag pattern. This will prevent ice dams from lifting shingles and causing leaks. This simple act will allow you to equalize the roof’s temperature in a proper way. You will be heating it from outside rather than blowing in cold are from the inside.

Quick Fixes for Ice Dam Removal

If you had not taken any measures to prevent ice dams before the bad weather struck, you will need to try some of the quick fixes. However, avoid certain actions like shoveling or using a hammer to hack away ice dams and throwing salt on them. To keep the ice dams in check, try these simple and effective quick fixes:

  1. Blow in Cold Air: The easiest way to remove ice dams blowing in cold air. Simply place a box fan into the attic, aiming it at the underside of your roof towards where water is leaking in. By target, cold air to this particular area will cause the water to free in its track. It will take you only a few minutes to stop the leakage.
  2. De-ice it: Use panty house to reduce the damage of an already formed ice dam. Simply fill a calcium chloride ice melter in the leg of a discarded pair of pantyhose. Then lay the hose onto the roof and allow it to cross the ice dam and overhand the gutter. Sometimes you may need to use a long-handled hoe or garden rake to push the hose into position. Within a short time, the calcium chloride will start melting through the snow and ice. This will create a channel through which the water will flow down, get into the gutters, and leave off the roof.
  3. Rake It: This is one of the quickest fixes to the ice dams. Use a long hand-held aluminum roof rake to pull off the snow as you stand on the ground. If you have a rake with wheels, the process will be a lot easier. Within no time, you will change the exterior temperature of the roof while avoiding damage to shingles.

What about Permanent Fixes?

While it may sound difficult, getting rid of permanent fixes is simple. The only rule of thumb is to keep the temperate of the entire roof at the same degrees as the eaves. This can be achieved by adding insulation, increasing ventilation, and sealing off all air leaks warming the underside of the roof. Prioritize these common trouble spots to get rid of ice dams once and for all.

  1. Ventilate Ridge and Eaves
    If your ridge vent is paired with soffit vents, they will be circulating cold air under the roof. Make sure both the soffit vents and ridge have the same size opening. Also, provide at least 1 sq. ft. of opening after every 300 sq. ft. of attic floor. Then put baffles at the eaves to keep the path clear for air flowing from the soffit vents.
  1. Keep the Hatch Capped
    A whole-house fan or an unsealed attic hatch creates an opening for heat escape. Take time to cover them with weather-stripped caps to form insulation. Use caps made of foil-faced foam board and hold them together with aluminum tape.
  1. Keep the Exhaust Facing Outside
    Ducts around the home and connected to the bathroom, kitchen, and dryer vents should lead outdoors wither through the walls or the roof. They should never lead through the soffit.
  1. Insulate
    Add insulation to the attic floor to keep more heat inside. Consulting with the building department in your area to find out how much it will cost you and start planning accordingly.
  1. Mount Sealed Can Lights
    They may sound old-styled, but these lights give off plumes of heat. Since you cannot insulate them without making them fire hazardous, they are ideal for keeping the heat it. Replace the lights with “IC” fixtures if you need to insulate them.
  1. Flash Around Your Chimneys
    Use L-shaped steel flashing to bridge the gap between your chimneys and the framing of the house. Hold the flashing in place using a fire-stop sealant. However, be aware that using insulation or canned spray foam is not fire safe.
  1. Insulate and Seal all the Ducts
    Use fiber-reinforced mastic to seal all the joints of the exhaust duct and HVAC ducts. Then cover the entire with either R-6 or R-5 foil-faced fiberglass.
  1. Seal all Penetrations
    Finally, seal around vent pipes and electrical cables with a fire-stop sealant. Check for any spots of lights shining up from below and seal then or where insulation is stained by dirt from the passing air.

How Heartland Roofing, Siding and Windows Can Help

Heartland Roofing, Siding and Windows, LLC is a trusted licensed general contractor who will help deal with the issue of ice dams. With a reputation of prompt and courteous service, you can always be sure that your home is in safe hands. Contact us today, and have an expert come your way to fix the problem.

Tips for Getting Rid of Ice Dams2021-02-01T08:39:23-06:00

10 Ways to Protect Your Home from the Winter Weather in Minnesota

10 Ways to Protect Your Home from the Winter Weather in Minnesota

December 2020 by Heartland Roofing Siding and Windows

winterizing home in cold climate

The adage, “prevention is better than cure” is still applicable to date. The best time to prepare and protect your home from Minnesota’s tough winters is during fall. Take the time to identify the risk your home faces, and the measures you can take to keep it safe. Since Minnesota’s winters tend to be frigid, preparation and winterizing your house is key to going through the winter in safety and comfort. It is also a good way to avoid incurring huge repair bills in spring. As you prepare for winters, here are a few things you need to consider:

  1. Clean Your Gutters
    If your gutters are blocked, they can damage your foundation, roof, and landscaping. As you prepare for winter, you should at least clean your gutters in spring and fall. Apart from the occasional cleaning, you should also clean them after a major storm that tends to send leaves flying. The right approach is to clean from a ladder instead of the roof. If you can, get a spotter or hire a professional to do the cleaning for you.
  1. Seal Windows and Doors
    Your heating bill would increase because cold air is leaking easily through cracks around your windows and doors. Weatherstripping your doors and caulking your windows can help to keep the house warm. If the last time you did it was last time, then this is the time to go back and check whether everything is in place. Take time to inspect your weather-stripping and make sure there are no leaks. Get a window insulation kit and properly apply the wrap to the inside of the window for that extra layer of protection.
  1. Trim Your Trees
    Your trees can cause a lot of damage to your home if the branches fall on your roof. Apart from winds, winter snow and ice are common culprits for making tree branches to fall. Trimming the branches that overhang your house in time can play an important role in protecting your roof. You can also hire a tree surgeon to do the work for you and ensure everything is in place.
  1. Seal Your Deck
    To keep your home safe, you need to apply a good sealant every few years or choose from a range of available permanent sealants. While opaque stains tend to last longer, clear treatments last for shorter periods and need to reapply every year. Any unsealed deck will attract mildew that will likely rot. Take time to seal your deck in fall without having for spring like everyone else. This is also a good time to check the deck for any damages that may have occurred during summer.
  1. Check and Change Your Furnace Filters
    As you prepare for winter, check the instructions from your manufacturer regarding the filters. Some furnaces may need filter replacement only in the fall while others require checking through the winter. Take this time to ruin the furnace to make sure it still works before it starts getting cold.
  1. Clean Your Chimney
    You should clean your chimney early enough before winter. It is custom practice for individuals with a wood fireplace to clean the chimney to reduce the risk of fire. Doing so at the right time not only makes sure you are safe but also ensures you got a way of keeping warm in the cold season.
  1. Insulate Your Pipes
    For those with pipes in the basement, this is the time to cover them with foam insulation. Wrap the pipes outside with heat tape to reduce the risk of frozen pipes. This will also help in reducing any problems and damages that can be caused by frozen pipes in your home.
  1. Put Away Lawn or Patio Furniture
    Before winter arises put away or cover your lawn and patio furniture, grill, or other items that you had kept outside during summer. Ensure the outdoors is clean, all kid’s toys have been gathered and put into the garage or indoors.
  1. Reverse Your Ceiling Fans
    The rule of thumb is to run your ceiling fans counterclockwise during summer and clockwise during winter. This will ensure that warm air is moving in the right direction for the season. The good thing is that most ceiling fans are reversible but just pressing a button.
  1. Winterize Your Garden

Winterize your sprinkler system and unhook the hoses before the first frost. Make sure you have emptied the rain barrel and turn it over before a hard freeze. Failure to do so may cause it to crack or even explode in the worst-case scenario. Empty the gas tank of your lawnmower or use a gas stabilizer to ensure it is safe.

Bottom Line

Preparing for winter is quite straightforward and simple if you know what to do. These simple steps will help you reduce your heating bill during the season and avoid expensive repairs to your home after winter.

Free Consultation Services

We also offer our customers free consultation services right before placing an order with us. Our consultation services are meant to help you make the right decision for your home improvement. We understand how difficult it can get to narrow down your options, but the process ought to be easier when working with an expert.

So, what are you waiting for? Contact us today and hire the best in roofing, siding, and windows services in Minnesota!

Heartland Roofing Siding and Windows is known for using the finest products in the industry for roofing installation with superior quality, unparalleled craftsmanship, and follows best practices, codes, and installation specifications. So, if you are looking for a reliable roofing contractor contact Heartland Roofing, Siding, and Windows today.

10 Ways to Protect Your Home from the Winter Weather in Minnesota2020-12-17T09:41:13-06:00

Energy-Saving Tips for Fall and Winter

Energy-Saving Tips for Fall and Winter

November 2020 by Heartland Roofing Siding and Windows

Winterize Your Home-2

As you plan to keep warm during the cool fall and cold winter months, you can save on energy costs by taking simple measures for your home. Try to keep the house warm while locking the cold outside. The tips shared in this article can be used daily as they are simple and affordable actions you can take to keep your home warm.

The first thing you need to do is conduct an energy audit of your home if you haven’t yet. An energy audit helps you identify areas you can save the most. It will also help you determine whether you need to make bigger investments for long-term energy saving. Based on your audit and the nature of your home, you can save energy and electricity costs this fall and winter by implementing the following tips:

  1. Utilize Heat From the Sun
    The heat from the sun is free for use and allows you to save energy if you use it in the right way. During the day, open curtains on the windows facing south to allow sunlight to heat up your home in a natural way. Make sure you close them early in the evening and night when it is chilly to reduce the amount of cold entering the house.
  2. Cover Drafty Windows
    You could be losing a lot of heat through drafty windows. During the cold winter months, use clear and heavy-duty plastic sheets to cover openings in your window frames. You can also tape plastic film and seal the openings tightly to reduce infiltration. Consider installing tight-fitting and insulating shades or drapes on the windows, which feel drafty after weatherizing.
  3. Find and Seal Leaks
    Any leaks in your home are a source of energy loss. Take time to find and seal air leaks in your house, especially around utility cut-through for pipes, gains in recessed lights in the insulated ceiling, gaps around chimneys, and unfinished spaced behind closets and cupboards. You may add weather-stripping and caulk to seal air leaks if your windows and doors are leaky.
  4. Adjust the House Temperature
    The temperature in your home should be ideal for the time of the day and activities you are engaged in. If you are home and awake, try setting your thermostat as low as you can. At night when you are asleep or when you are out of the house, setting your thermostat to around 10 – 15 degrees can save you more than 10% on your heating and cooling bills. Nowadays, you can even install a programmable or smart thermostat that allows you to automatically set the temperature depending on the time of day.
  5. Reduce Heat Loss from the Fireplace
    You can take a few measures to reduce heat loss from your fireplace. When you use the fireplace, open the damper in the bottom in the bottom of the firebox. You can also open the nearest windows about 1 inch and the door leading to the room. Then lower the thermostat setting to about 50 or 550 F. When there is no fire burning, always keep the fireplace damper closed.For those who never use the fireplace, it is advisable to plug and seal the chimney flue. However, if you use the fireplace regularly, install a heat-air exchange system and tempered glass doors to ensure warm air is blown back into the room. You may also acquire C-shaped metal grates to draw cool air from the room into the fireplace while circulating warm air into the room. Other measures you may take include adding caulking around the hearth of the fireplace and ensuring the fireplace flue damper is snugly sealed.
  6. Maintain Your Heating System
    You could be using lots of energy and incurring extra costs if your heating system is inefficient. Schedule for servicing on a regular basis to ensure everything is working effectively. Replace your furnace and haring pump filters once every month or as needed. Also, clean the wood and pellet-burning heaters vents on a regular basis to ensure the home is heated properly.
  7. Lower Holiday Lighting Costs
    You can save on more energy by keeping your holiday lighting costs minimal. LED light strings provide a budget way of decorating the home for winter.
  8. Reduce the Cost of Heating Water
    Save extra electricity cost by turning down the water heater temperature to 1200 F warm setting. The setting allows you to save energy while avoiding scalding your hands.

Windows

While most of the tips shared here can qualify as DIYs, a professional will make sure everything is done the right way. Heartland Roofing, Siding, and Windows is a general contractor specializing in roofing, siding, windows, and gutters.

Free Consultation Services

We also offer our customers free consultation services right before placing an order with us. Our consultation services are meant to help you make the right decision for your home improvement. We understand how difficult it can get to narrow down your options, but the process ought to be easier when working with an expert.

So, what are you waiting for? Contact us today and hire the best in roofing, siding, and windows services in Central Iowa!

Heartland Roofing Siding and Windows is known for using the finest products in the industry for roofing installation with superior quality, unparalleled craftsmanship, and follows best practices, codes, and installation specifications. So, if you are looking for a reliable roofing contractor contact Heartland Roofing, Siding, and Windows today.

Energy-Saving Tips for Fall and Winter2020-11-18T09:16:21-06:00
Go to Top